pfSense Setup
Install Plugin + WZ Logger
Install WiZone Plugin on pfSense via one-command install, then configure WiFi interface, DHCP, and WZ-Logger.
Step 1 – Get Install Command from WiZone Portal
- Log in to WiZone Portal → NAS and select the target NAS.
- Click NAS Configuration to open the device setup panel.
- Copy the Install Command — it's a one-time token valid for 15 minutes.
The install command expires after 15 minutes. Click Regenerate if it expires before you can run it.
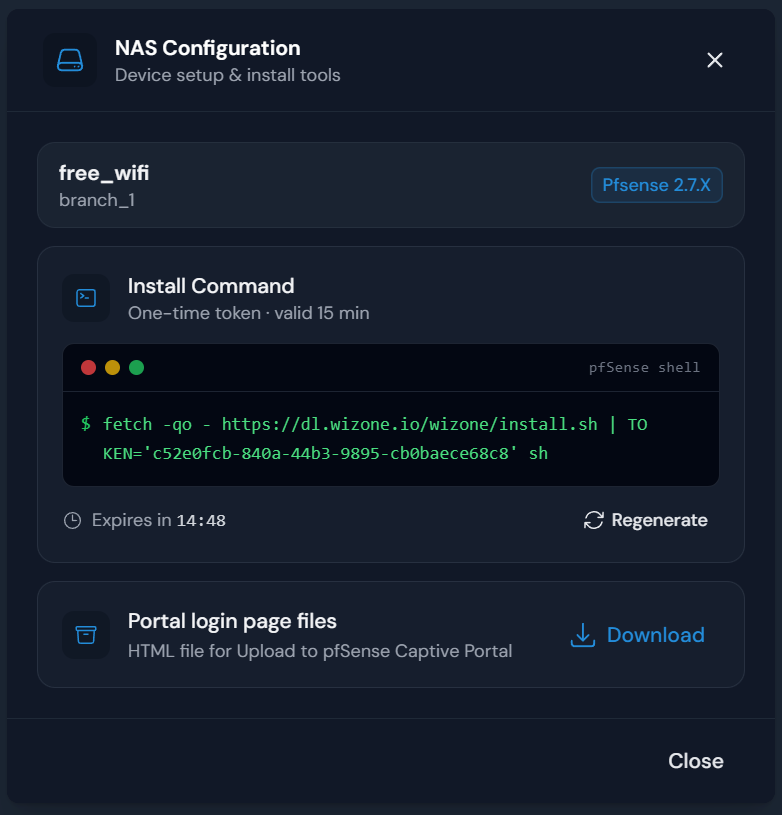
Download the Portal login page files now.
On the same page, click Download under Portal login page files. You'll need this in Stage 3 (Captive Portal setup).
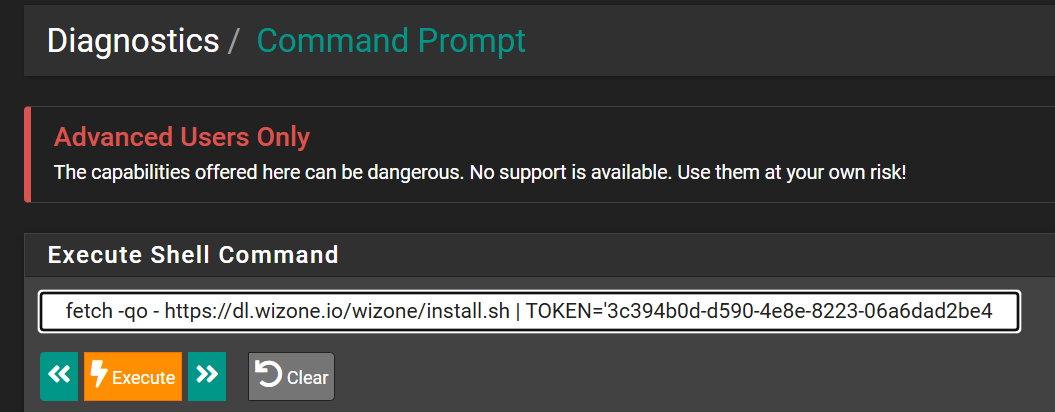
Step 2 – Run the Install Command on pfSense
- In pfSense, go to Diagnostics → Command Prompt.
- Paste the install command into the Execute Shell Command field.
- Click Execute.
Do not navigate away from this page until the script finishes. The installation log will appear below — wait until you see ✓ Installation complete! before proceeding.
Step 3 – Verify Installation Output
The shell will output a full installation log. Wait for ✓ Installation complete! before continuing.
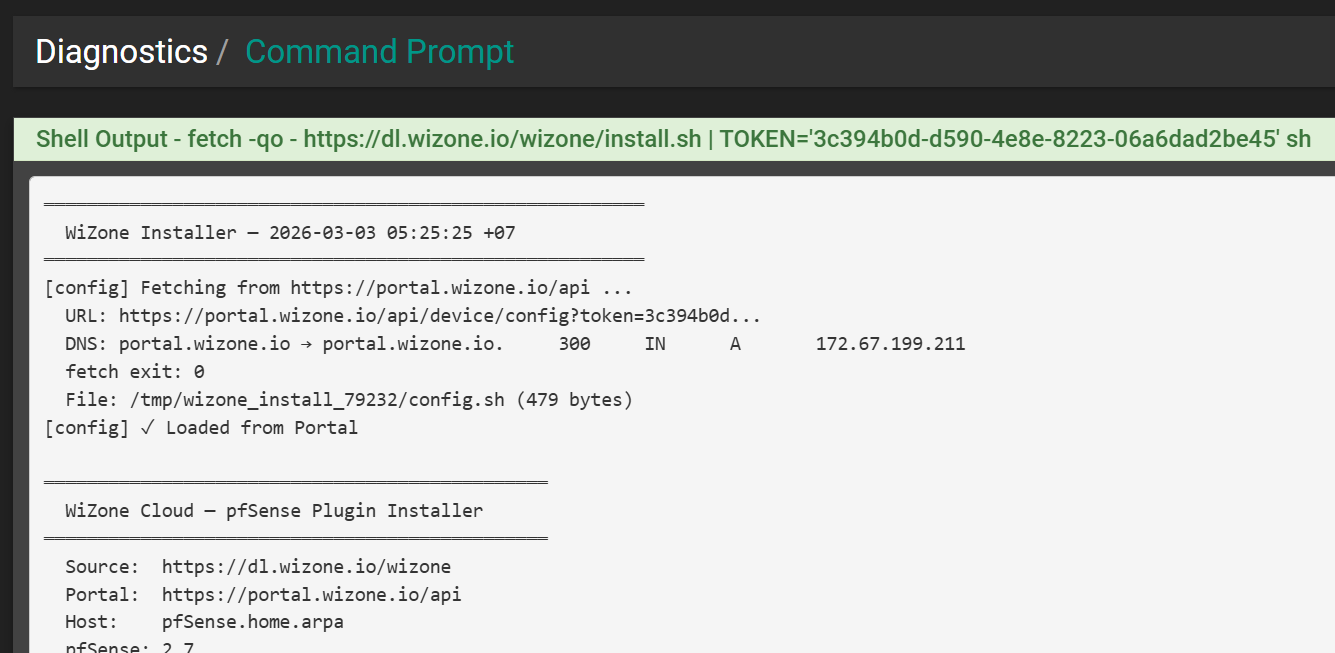
The installer auto-configures the following:
| Component | Details |
|---|---|
| WireGuard | Tunnel, peer, interface assignment, gateway, routes, firewall rules |
| RADIUS | Auth server RAD_WiZone with IP and shared secret |
| Core Files | api-pfsense-lib.php, utils_captive.php, captiveportal.inc |
| WZ-Logger | Logger script and cron job |
| Remote Syslog | Syslog forwarding to WiZone Portal |
Step 4 – Check Plugin Status
Go to Services → WiZone → Overview to verify the installation state.
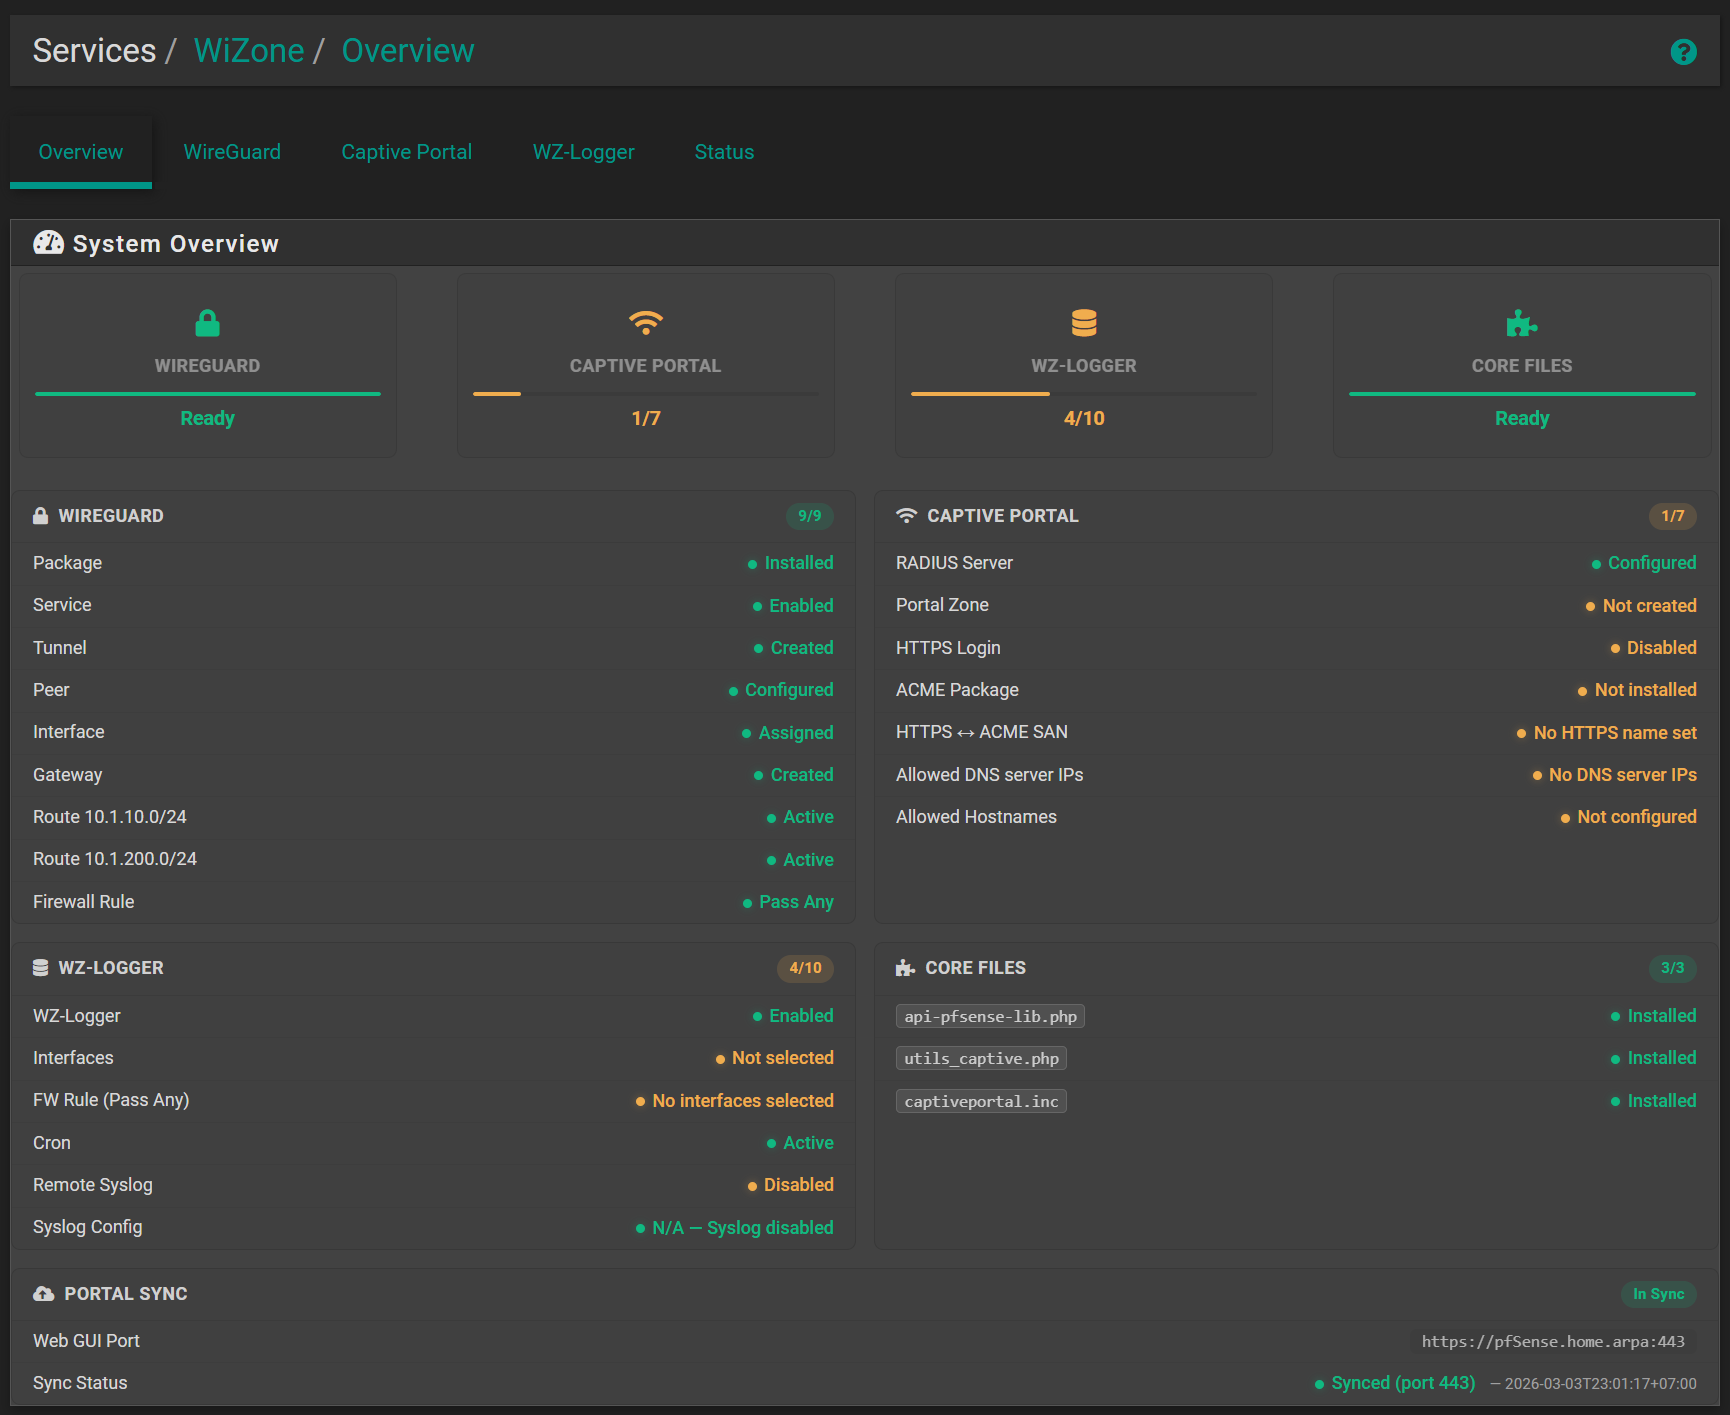
| Section | Status | Notes |
|---|---|---|
| WIREGUARD | ✅ Ready | Auto-configured by installer |
| CAPTIVE PORTAL | 1/7 | Configure in Stage 3 |
| WZ-LOGGER | 4/10 | Select WIFI interface in Step 6. Will show Ready after Stage 3 |
| CORE FILES | ✅ Ready | Auto-installed by installer |
Step 5 – Configure WiFi Interface and DHCP (Skip if already configured)
Skip this step if your WiFi interface and DHCP are already configured.
A working WiFi interface must exist before you can select it in WZ-Logger (Step 6).
5.1 – WiFi Interface
Go to Interfaces → your assigned WiFi interface and configure:
| Field | Example |
|---|---|
| Enable | ✅ |
| Description | WIFI |
| IPv4 Configuration Type | Static IPv4 |
| IPv4 Address | 10.10.252.1/24 |
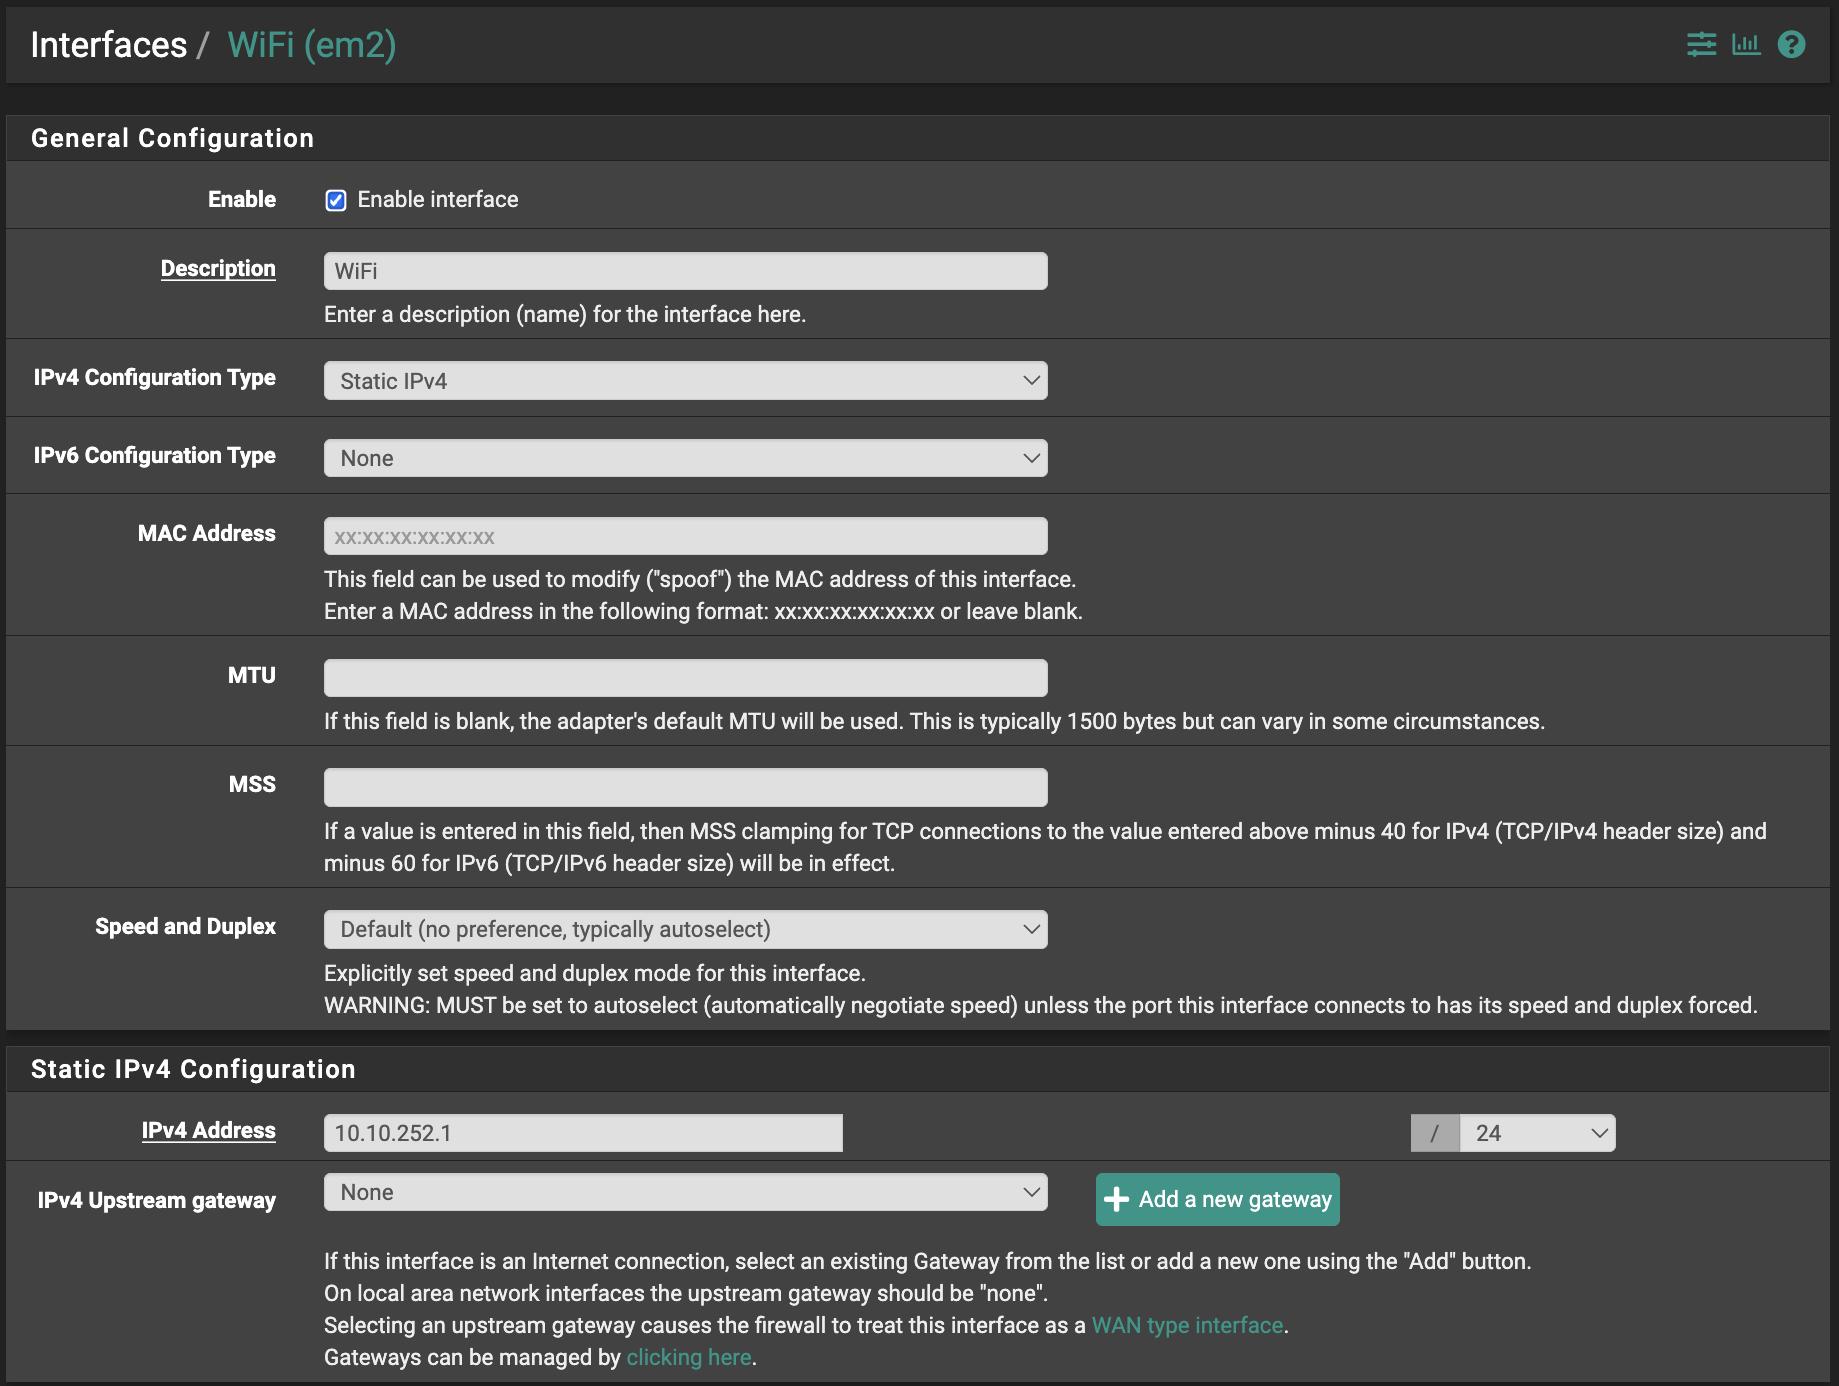
Click Save and Apply Changes.
5.2 – DHCP Server
Go to Services → DHCP Server → WIFI, enable it, and configure:
| Field | Example |
|---|---|
| Address Pool Range | 10.10.252.10 – 10.10.252.30 |
| DNS 1 | 10.10.252.1 (WiFi interface IP) |
| DNS 2 / 3 | 8.8.8.8 / 1.1.1.1 |
| Gateway | 10.10.252.1 |
| Default/Max Lease Time | 86400 |
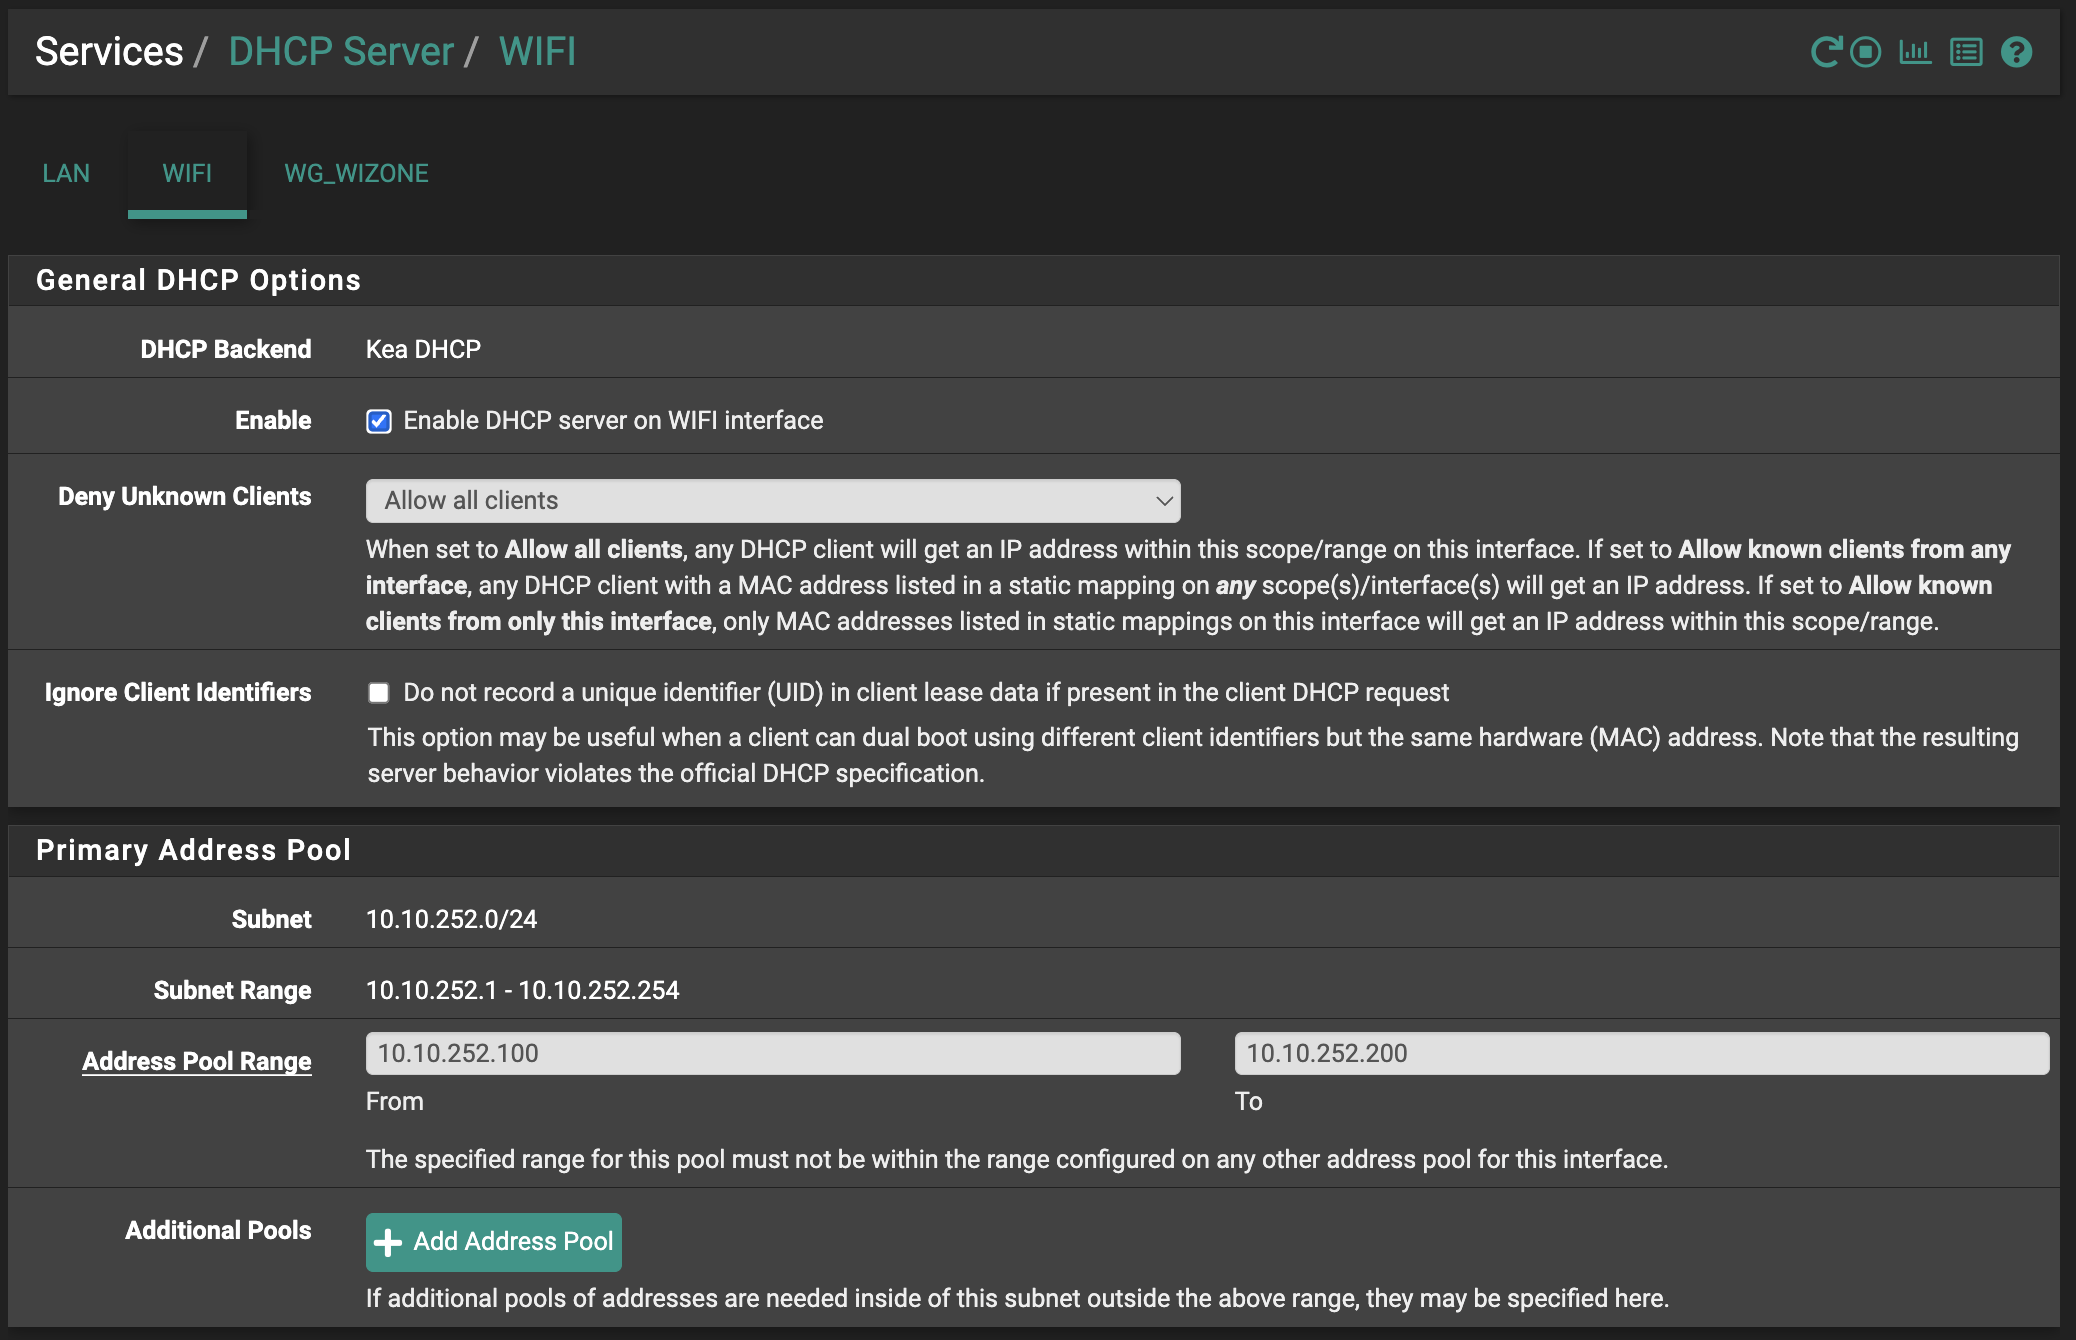
Click Save.
Step 6 – Configure WZ-Logger
Go to Services → WiZone → WZ-Logger.
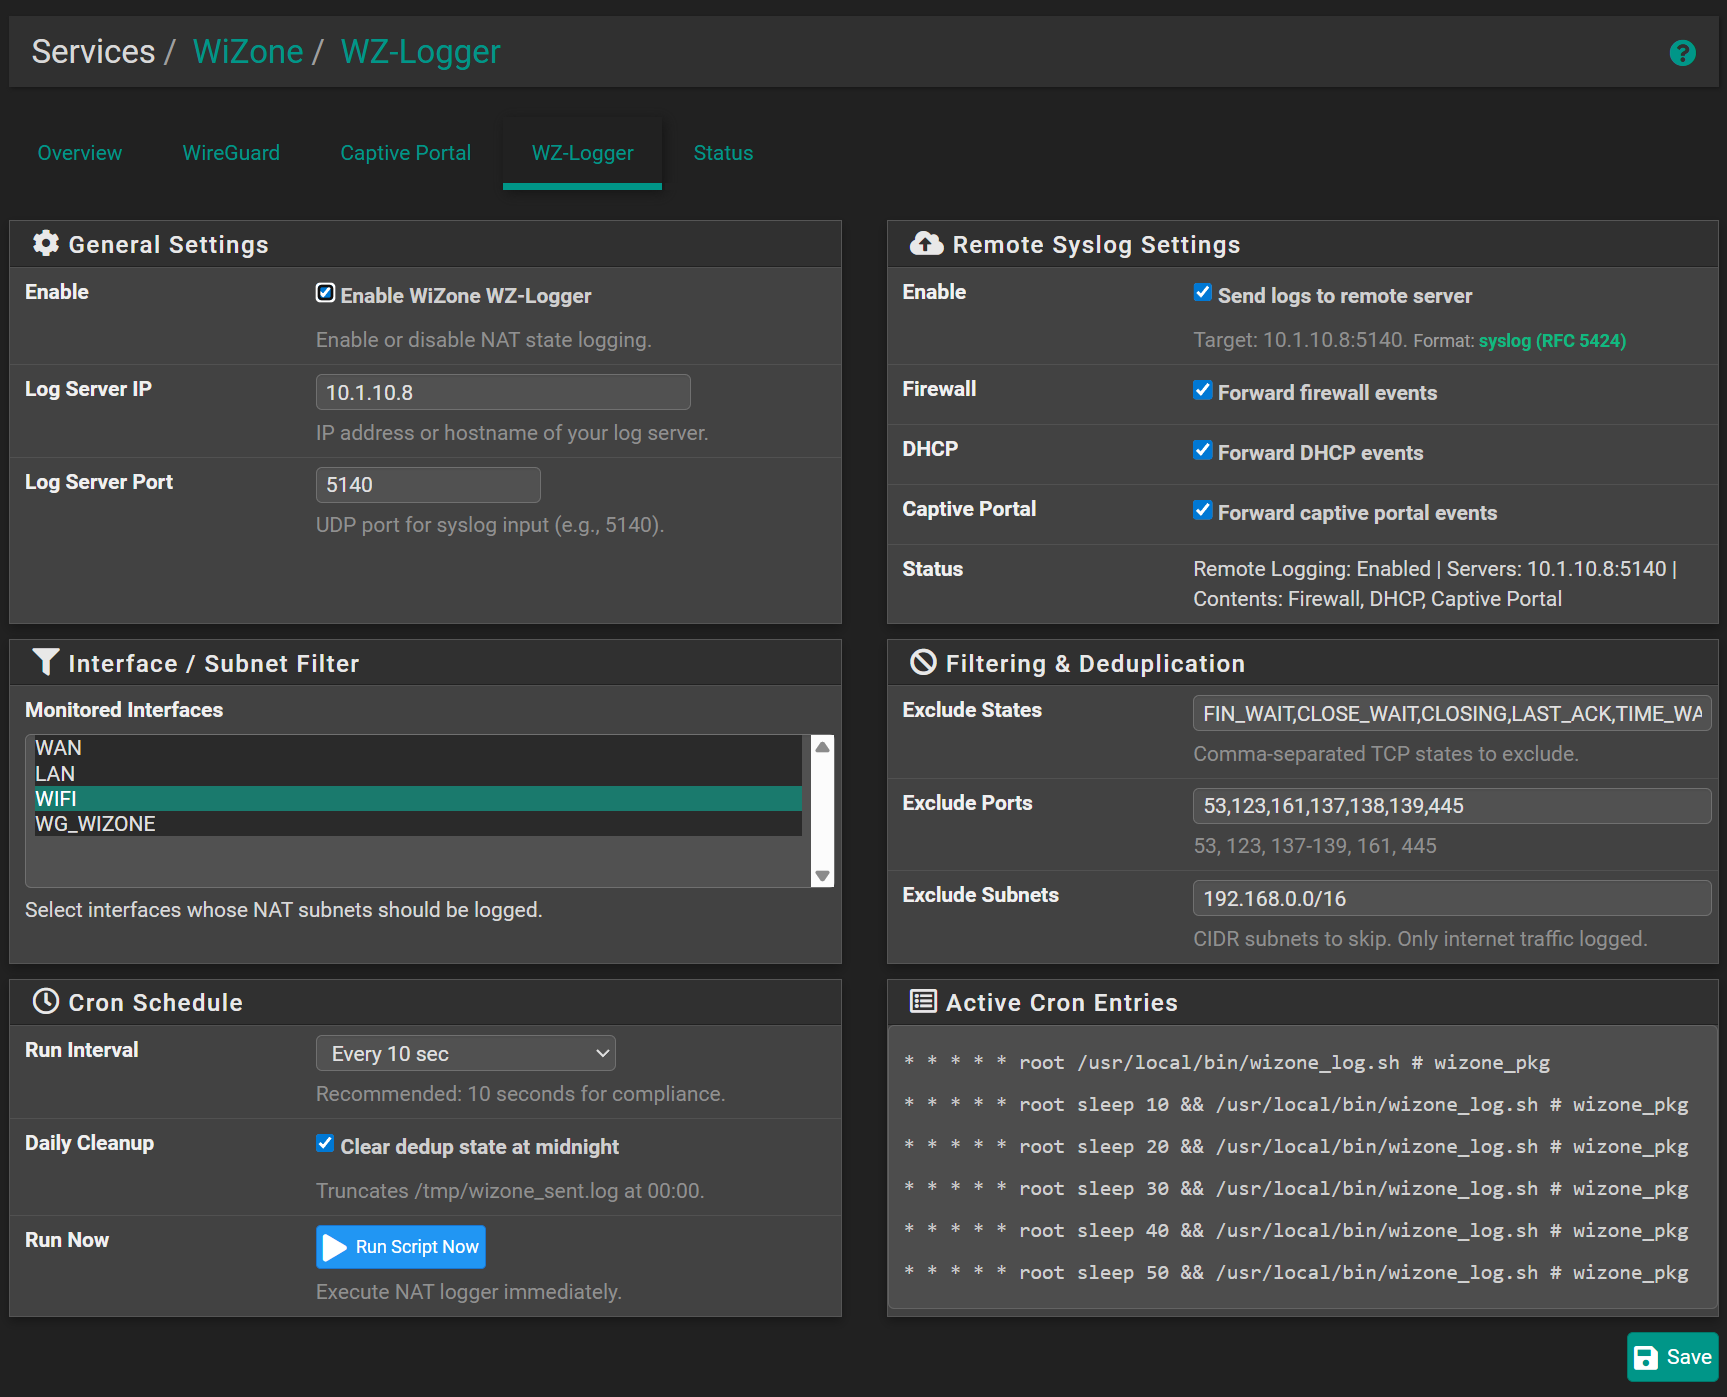
General Settings
| Field | Value |
|---|---|
| Enable | ✅ Enable WiZone WZ-Logger |
| Log Server IP | (auto-filled from WiZone Portal) |
| Log Server Port | 5140 |
Interface / Subnet Filter
Select interfaces to monitor. At minimum, enable WIFI (configured in Step 5):
| Interface | Purpose |
|---|---|
WAN | Internet uplink |
LAN | Internal network |
WIFI | Guest Wi-Fi (required) |
WG_WIZONE | WireGuard tunnel |
Remote Syslog Settings
| Field | Value |
|---|---|
| Send logs to remote server | ✅ |
| Forward firewall events | ✅ |
| Forward DHCP events | ✅ |
| Forward captive portal events | ✅ |
Click Save.
After selecting the WIFI interface, WZ-LOGGER will show Ready in the WiZone Overview.